愛的走馬看花 Red Hat CoreOS 與 Red Hat OpenShift Part 1
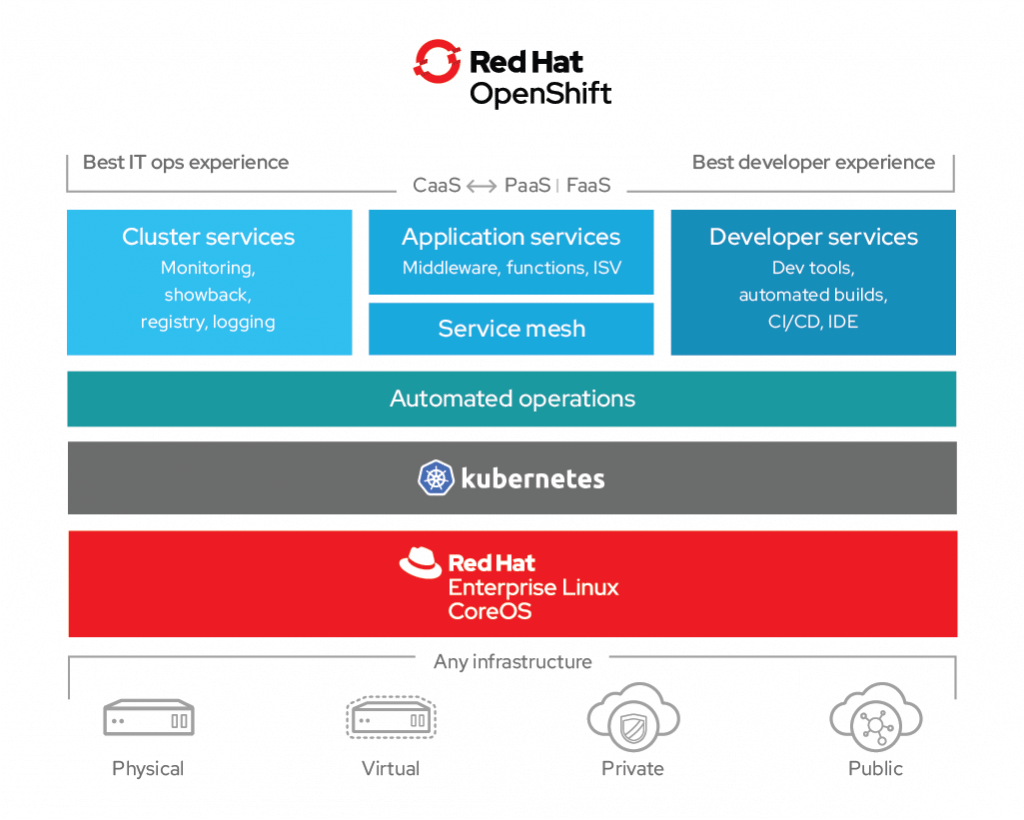
誠如大家所知,因爲種種技術及非技術因素上 - Why Red Hat is investing in CRI-O and Podman,OpenShift 4 底層有兩個蠻大的更新
- 容器運行時環境 (Container Runtime) 從 docker 換成了 CRI-O
- 作業系統從通用型 Red Hat Enterprise Linux 換成了專為容器特化的容器作業系統 Red Hat CoreOS
本文將記錄一下於 Red Hat CoreOS (RHCOS) 及 Red Hat OpenShift 偏作業系統層面的探索紀錄
前提

因為小弟已經裝好了 Red Hat OpenShift 4 的環境,所以我已經有 3 master 及 2 compute 節點可以登進去使用,倘若你想要自己研究的話,可以下載 Fedora CoreOS 試試看
走馬看花之旅: 第一天
登入 CoreOS 節點
Red Hat CoreOS is a container OS
有兩個方式:
- 直接透過 SSH 登入
- 如果是透過 OpenShift,可以透過
oc debug進入
先講第一種方式,這邊唯一的要留意的就是,預設登入的帳號是 core,而不是 root,而且僅能拿當初透過 ignition file 匯入至 CoreOS 的 SSH Private Key 登入
$ ssh [email protected] -i ~/.ssh/id_rsa_ocp4_vcenter

Red Hat Enterprise Linux CoreOS 43.81.202003052336.0
  Part of OpenShift 4.3, RHCOS is a Kubernetes native operating system
  managed by the Machine Config Operator (`clusteroperator/machine-config`).

WARNING: Direct SSH access to machines is not recommended; instead,
make configuration changes via `machineconfig` objects:
  https://docs.openshift.com/container-platform/4.3/architecture/architecture-rhcos.html

---
Last login: Tue Mar 17 03:01:29 2020 from 10.0.97.100
[core@compute-0 ~]$ cat /etc/os-release
NAME="Red Hat Enterprise Linux CoreOS"
VERSION="43.81.202003052336.0"
VERSION_ID="4.3"
OPENSHIFT_VERSION="4.3"
RHEL_VERSION=8.0
PRETTY_NAME="Red Hat Enterprise Linux CoreOS 43.81.202003052336.0 (Ootpa)"
ID="rhcos"
ID_LIKE="rhel fedora"
ANSI_COLOR="0;31"
HOME_URL="https://www.redhat.com/"
BUG_REPORT_URL="https://bugzilla.redhat.com/"
REDHAT_BUGZILLA_PRODUCT="OpenShift Container Platform"
REDHAT_BUGZILLA_PRODUCT_VERSION="4.3"
REDHAT_SUPPORT_PRODUCT="OpenShift Container Platform"
REDHAT_SUPPORT_PRODUCT_VERSION="4.3"
OSTREE_VERSION='43.81.202003052336.0'
第二種方式是透過 oc debug 運行一個 debug 用的 pod 後,再透過 chroot 切換到 / 目錄
$ oc debug node/compute-0
Starting pod/compute-0-debug ...
To use host binaries, run `chroot /host`

Pod IP: 10.0.97.4
If you don't see a command prompt, try pressing enter.
sh-4.2# chroot /host
sh-4.4# cat /etc/os-release
NAME="Red Hat Enterprise Linux CoreOS"
VERSION="43.81.202003052336.0"
VERSION_ID="4.3"
OPENSHIFT_VERSION="4.3"
RHEL_VERSION=8.0
PRETTY_NAME="Red Hat Enterprise Linux CoreOS 43.81.202003052336.0 (Ootpa)"
ID="rhcos"
ID_LIKE="rhel fedora"
ANSI_COLOR="0;31"
HOME_URL="https://www.redhat.com/"
BUG_REPORT_URL="https://bugzilla.redhat.com/"
REDHAT_BUGZILLA_PRODUCT="OpenShift Container Platform"
REDHAT_BUGZILLA_PRODUCT_VERSION="4.3"
REDHAT_SUPPORT_PRODUCT="OpenShift Container Platform"
REDHAT_SUPPORT_PRODUCT_VERSION="4.3"
OSTREE_VERSION='43.81.202003052336.0'
切換成 root
預設在 RHCOS 裡面僅會有兩個帳號,分別是 core 及 root,而預設已經把 sudoers 寫好了,所以可以直接 sudo 切過去
[core@compute-0 ~]# cat /etc/passwd
root:x:0:0:root:/root:/bin/bash
core:x:1000:1000:CoreOS Admin:/var/home/core:/bin/bash
[core@compute-0 ~]$ sudo su -
Last login: Tue Mar 17 02:41:02 UTC 2020 on pts/0
[root@compute-0 ~]#
CRI-O 探索
CRI-O is a lightwieght container runtime for Kubernetes
誠如開頭所說的,OpenShift 4 預設的 Container Runtime 是採用 CRI-O,所以若要在 CoreOS 上找尋類似於 docker 或 podman 的指令,則為 crictl
常用的指令組合不外乎為 crictl [images | ps | pods | stats],詳細的操作指令輸出可以參考 Debugging Kubernetes nodes with crictl
但畢竟 CRI-O 主要設計上還是給 OpenShift / Kubernetes 這類容器平台使用,所以老實講,拿著 crictl 要在 CoreOS 上面要啟動一個服務,而它的最小單位是 Pod,所以你需要先準備好 pod-config.json 及 container-config.json,而執行的指令則是使用 crictl runp 及 crictl create,去跑一個完整的 Pod 起來才能單機使用,整體上是相當有複雜性的
倘若是只是要在 CoreOS 上面跑一個容器試試的話,就像是常見如 docker 運行的方式的話,還是使用 podman 較為恰當,有興趣可以參考此投影片 The First Journey from Docker to Podman - Phil Huang
運行一個容器於 CoreOS 上
It make sense to run any container on container OS
假設我想要跑 tcpdump 在節點上,但原生 RHCOS 是沒有包含這個套件的,這時候就得要執行一個自帶 tcpdump 的容器運行在節點上,而先前有針對這議題寫過一篇文章 Troubleshooting from Container to Any - Phil Huang 也是基於同樣的概念
我這邊僅記錄 Red Hat CoreOS 的用法
[root@bastion]# ssh [email protected] -i ~/.ssh/id_rsa_ocp4_vcenter

[core@compute-0 ~]$ sudo su -

[root@compute-0 ~]# podman run \
    --hostname debug-toolbox \
    --name ocp-debug-container \
    --network host \
    --privileged \
    --security-opt label=disable \
    --tty \
    --rm \
    -it \
    --volume /:/host/:rslave \
    quay.io/pichuang/debug-container
[root@debug-toolbox /]# tcpdump -i ens192 -w /host/home/core/tcpdump.pcap
[root@debug-toolbox /]# scp /host/home/core/tcpdump.pcap [email protected]:~/

[root@debug-toolbox /]# exit
[root@compute-0 ~]# podman ps
常見服務 systemd / journalctl
在 RHCOS 中,你還是可以使用 systemd 或 journalctl 做觀察性質的操作
[root@compute-0 ~]# systemctl status crio
● crio.service - Open Container Initiative Daemon
   Loaded: loaded (/usr/lib/systemd/system/crio.service; disabled; vendor preset: disa>
  Drop-In: /etc/systemd/system/crio.service.d
           └─10-default-env.conf
   Active: active (running) since Tue 2020-03-17 03:17:12 UTC; 3h 7min ago
     Docs: https://github.com/cri-o/cri-o
 Main PID: 1588 (crio)
    Tasks: 37
   Memory: 638.8M
      CPU: 15min 23.689s
   CGroup: /system.slice/crio.service
           ├─  1588 /usr/bin/crio --enable-metrics=true --metrics-port=9537
           ├─587682 /usr/libexec/crio/conmon -c 72482678b7cd9b0384fca2486d89e320c21cfe>
           ├─587683 /usr/bin/runc --root=/run/runc exec --pid-file /tmp/pidfile4561585>
           └─587693 /usr/bin/runc init

[root@compute-0 ~]# journalctl
6. 修改 RHCOS 設定檔
WARNING: Direct SSH access to machines is not recommended; instead, make configuration changes via
machineconfigobjects
Choosing how to configure RHCOS - Red Hat OpenShift 4.3 指出 3 種修改方向
- 透過 Kubernetes 內建的物件 (DaemonSet / Deployment) 等,這常見於你想要裝一些服務在 RHCOS 上面,譬如像是網路套件、自己寫的 Agent 等
- Day 2 Customization: 一般來說,
不建議透過 SSH 直接連線至 RHCOS 上進行修改設定檔,現行建議透過控制集群等級 (Cluster-level) 的MachineConfigs或者是控制節點等級 (Node-level) 的Tuned等進行設定檔修改 - Day 1 Customization: 運行集群前的設定,大部分都是要改 ntp / dns 居多,這個得要靠修改
ignition來辦到,但建議是不要修太多,大部分的設定等到安裝完之後再修就好
這邊討論最直覺的 2. Day 2 Customization 中的 MachineConfig
假設我想要修改角色為 MachineConfigPools 當中 worker 的 /etc/chrony.conf,會有以下的事情要做
# 檢查運行中的 machineconfig
$ oc get mc
NAME                                                        GENERATEDBYCONTROLLER                      IGNITIONVERSION   CREATED
00-master                                                   d5599de7a6b86ec385e0f9c849e93977fcb4eeb8   2.2.0             12h
00-worker                                                   d5599de7a6b86ec385e0f9c849e93977fcb4eeb8   2.2.0             12h
01-master-container-runtime                                 d5599de7a6b86ec385e0f9c849e93977fcb4eeb8   2.2.0             12h
01-master-kubelet                                           d5599de7a6b86ec385e0f9c849e93977fcb4eeb8   2.2.0             12h
01-worker-container-runtime                                 d5599de7a6b86ec385e0f9c849e93977fcb4eeb8   2.2.0             12h
01-worker-kubelet                                           d5599de7a6b86ec385e0f9c849e93977fcb4eeb8   2.2.0             12h
99-master-6d33985b-9a3d-4934-94c5-60df362b79e6-registries   d5599de7a6b86ec385e0f9c849e93977fcb4eeb8   2.2.0             12h
99-master-ssh                                                                                          2.2.0             12h
99-worker-b3d2e28e-a1e9-44f6-80a5-2d74bca78e7f-registries   d5599de7a6b86ec385e0f9c849e93977fcb4eeb8   2.2.0             12h
99-worker-ssh                                                                                          2.2.0             12h
rendered-master-069a77d9b6f06c7e88bc0bcf107388bc            d5599de7a6b86ec385e0f9c849e93977fcb4eeb8   2.2.0             12h
rendered-worker-5109aac45ee18a5b942c38a7bb060f95            d5599de7a6b86ec385e0f9c849e93977fcb4eeb8   2.2.0             12h

# 顯示 50-worker-chrony 的 YAML 檔案
$ cat 50-worker-chrony.yaml
apiVersion: machineconfiguration.openshift.io/v1
kind: MachineConfig
metadata:
  labels:
    machineconfiguration.openshift.io/role: worker
  name: 50-worker-chrony
spec:
  config:
    ignition:
      version: 2.2.0
    storage:
      files:
      - contents:
          source: data:text/plain;charset=utf-8;base64,c2VydmVyIHRpY2suc3RkdGltZS5nb3YudHcgbWF4ZGVsYXkgMC40IG9mZmxpbmUKc2VydmVyIHRpbWUuc3RkdGltZS5nb3YudHcgbWF4ZGVsYXkgMC40IG9mZmxpbmU=
        filesystem: root
        mode: 0644
        path: /etc/chrony.conf

$ oc create -f 50-worker-chrony.yaml

# 針對 worker 角色依序重開
$ oc get nodes -w
compute-0         Ready                         worker   13h   v1.16.2
compute-0         Ready,SchedulingDisabled      worker   13h   v1.16.2
compute-0         NotReady,SchedulingDisabled   worker   13h   v1.16.2
compute-0         Ready,SchedulingDisabled      worker   13h   v1.16.2
compute-0         Ready                         worker   13h   v1.16.2
compute-1         Ready                         worker   13h   v1.16.2
compute-1         Ready,SchedulingDisabled      worker   13h   v1.16.2
compute-1         NotReady,SchedulingDisabled   worker   13h   v1.16.2
compute-1         Ready,SchedulingDisabled      worker   13h   v1.16.2
compute-1         Ready                         worker   13h   v1.16.2

# 檢查檔案
$ ssh [email protected] -i ~/.ssh/id_rsa_ocp4_vcenter
[core@compute-0 ~]$ cat /etc/chrony.conf
沒錯,只要透過 Machine Config 有任何修改,預設都會依序重開節點,倘若真的不想要重開的話,可以透過修改 Machine Config Pool 的 paused 來暫時停止
# 關閉自動重啟
oc patch --type=merge --patch='{"spec":{"paused":true}}' machineconfigpool/master
oc patch --type=merge --patch='{"spec":{"paused":true}}' machineconfigpool/worker

# 打開自動重啟
oc patch --type=merge --patch='{"spec":{"paused":false}}' machineconfigpool/master
oc patch --type=merge --patch='{"spec":{"paused":false}}' machineconfigpool/worker
Openshift Tips - MachineConfig 除了我上面提到的 chrony 的改變以外,裡面還有幾個範例: 1. Apply sysctl tweaks to nodes 2. Modify MTU in a second interface in workers
後記
先記錄到這邊,之後陸續把一些維運上常見的問題慢慢地補充上來
Appendix
如何使用任意 User ID 啟動 Container Image?
使用 oc create serviceaccount 新增一個可以跑 anyuid 的帳號
# 確認當前 service account
oc get serviceaccount

# 新增 service account - runasanyuid
oc create serviceaccount runasanyuid

# 確認新增後 service account
oc get serviceaccount
預設狀況下,容器會受限於 SCC restricted 下運行,Run As User 的 Must Run As Range 的 UID 範圍會受限於專案 (Porject) 設定
倘若需要允許應用程式以任何使用者 ID (包含 root) 執行,則需要新增 SCC anyuid 給指定的 service account
# 以 administrator 權限,確認當前 SCC 清單
oc get scc --as system:admin

# 確認 SCC - restricted
oc describe scc restricted

# 新增 SCC - anyuid 能力給 service account - runasanyuid 於當前專案 project - debbuging
oc adm policy add-scc-to-user anyuid -z runasanyuid --as system:admin
References
- Why Red Hat is investing in CRI-O and Podman - Red Hat Blog
- CRI-O - LIGHTWEIGHT CONTAINER RUNTIME FOR KUBERNETES
- Installing CoreOS on Bare Metal - Fedora CoreOS
- Debugging Kubernetes nodes with crictl - Kubernetes
- Troubleshooting from Container to Any - Phil Huang
- How to TCPdump effectively in Kubernetes (part 1)
- How to TCPdump effectively in Kubernetes (part 2)
- How can I enable an image to run as a set user ID?
- 配置安全環境定義限制
- The First Journey from Docker to Podman - Phil Huang
- Choosing how to configure RHCOS - Red Hat OpenShift 4.3
- Openshift Tips - MachineConfig